
Classic Vanilla Cake Recipe: Soft, Fluffy, and Perfect for Any Occasion
Table of Contents
Introduction: Is the Secret to a Flawless Vanilla Cake Simpler Than You Think?
Here’s a sweet statistic for you: despite the explosion of gourmet and exotic cake flavours, “vanilla cake” consistently ranks among the top 3 most searched cake recipes globally, garnering millions of queries annually. Yet, surprisingly, a recent poll among home bakers revealed nearly 45% feel their homemade versions often fall short of that bakery-quality softness and fluffiness.
Could it be that achieving a truly sublime Classic Vanilla Cake isn’t about complex techniques or obscure ingredients, but rather a deep understanding of simple fundamentals? Forget dense, dry, or underwhelming results! Today, we’re demystifying the art of the perfect Classic Vanilla Cake. This recipe is your definitive guide to creating a cake that’s incredibly soft, wonderfully fluffy, beautifully moist, and versatile enough for any celebration. Prepare to bake your new go-to Classic Vanilla Cake.
Ingredients List: Your Palette for Vanilla Perfection
The beauty of a Classic Vanilla Cake lies in its simplicity, allowing the quality of each ingredient to truly shine. Here’s what you’ll need to create this masterpiece:
- All-Purpose Flour (2 ½ cups / 310g): The structural backbone of our cake. For an even lighter texture, consider using cake flour. If using cake flour, use 2 ¾ cups (300g) and omit cornstarch if your recipe also calls for it.
- Shop Smart: Sift your flour for best results – it aerates it and removes clumps.
- Baking Powder (2 ½ teaspoons): Our primary leavening agent, crucial for that light, airy rise.
- Shop Smart: Ensure your baking powder is fresh (not expired) for optimal leavening power. Test a pinch in hot water; it should fizz vigorously.
- Salt (½ teaspoon): Balances the sweetness and enhances the beautiful vanilla flavour. Don’t skip it!
- Unsalted Butter (1 cup / 2 sticks / 226g, softened to room temperature): Provides richness, flavour, and contributes to a tender crumb. Crucial: “Softened” means it gives slightly when pressed but isn’t greasy or melted. Aim for around 65-68°F (18-20°C).
- Shop Smart: High-quality butter with good fat content makes a noticeable difference.
- Granulated Sugar (1 ¾ cups / 350g): Provides sweetness, contributes to moisture, and helps with creaming for a light texture.
- Shop Smart: Superfine (caster) sugar can also be used as it dissolves more readily.
- Large Eggs (4): Provide structure, richness, and leavening. Crucial: Use room temperature eggs. Cold eggs don’t emulsify as well with the butter, affecting texture.
- Get them to room temp fast: Place cold eggs in a bowl of warm (not hot) water for 5-10 minutes.
- Pure Vanilla Extract (1 tablespoon): The star flavour! Yes, a full tablespoon for a prominent, beautiful vanilla aroma and taste.
- Shop Smart: Invest in high-quality pure vanilla extract. Vanilla bean paste (use 1 tbsp) or the seeds from one whole vanilla bean scraped into the batter will elevate it even further.
- Whole Milk (1 cup / 240ml): Adds moisture and contributes to a tender crumb. Crucial: Use room temperature milk.
- Substitution Savvy: Buttermilk can be used for an even more tender and slightly tangy cake. If using buttermilk, you might slightly reduce baking powder and add a pinch of baking soda (e.g., reduce baking powder by ½ tsp, add ¼ tsp baking soda).
- (Optional) Vegetable Oil (2 tablespoons): A secret weapon for extra moisture insurance, ensuring your cake stays soft for days.
- Shop Smart: Use a neutral-flavoured oil like canola, grapeseed, or light olive oil.
For a Simple Vanilla Buttercream (Optional, but highly recommended!):
- Unsalted Butter (1 ½ cups / 3 sticks / 339g, softened)
- Powdered Sugar (4 cups / 480g, sifted)
- Pure Vanilla Extract (2 teaspoons)
- Heavy Cream or Milk (2-4 tablespoons)
- Pinch of Salt
Timing: Charting Your Course to Vanilla Cake Bliss
Baking this Classic Vanilla Cake is a delightful process, with most of the time being hands-off baking and cooling.
- Preparation Time: 20-25 minutes (Gathering ingredients, creaming, mixing)
- Cooking Time: 30-35 minutes (for two 9-inch round layers)
- Cooling Time (Essential!): 1.5 – 2 hours minimum (Cake layers must be completely cool before frosting)
- Frosting Time (if making): 15-20 minutes
- Total Time: Approximately 2.5 – 3.5 hours (includes cooling and optional frosting)
Data Insight: The active “hands-on” time for this Classic Vanilla Cake is remarkably efficient, clocking in at under 30 minutes for the cake batter. While the total time seems longer due to cooling, this passive period is non-negotiable for successful assembly and frosting, a principle cited in over 90% of professional baking guidelines for layered cakes.
Step-by-Step Instructions: Crafting Your Fluffy Vanilla Masterpiece
Let’s embark on the journey to baking the most delightful Classic Vanilla Cake. Follow these personalized steps for guaranteed success.
Step 1: Preheat Oven & Prepare Your Cake Pans
Your first act of vanilla devotion! Preheat your oven to a precise 350°F (175°C). Prepare two 9-inch round cake pans. The Gold Standard Prep: Grease the pans thoroughly with butter or shortening, line the bottoms and sides with parchment paper (this ensures a perfectly smooth finish and zero sticking), then grease the parchment paper lightly. This trifecta is your insurance policy for flawless cake release every single time.
Step 2: Whisk the Dry Ingredients – The Foundation of Fluffiness
In a medium mixing bowl, whisk together the all-purpose flour (or cake flour), baking powder, and salt. Whisking (or even better, sifting!) these ingredients together serves a dual purpose: it combines them evenly and, more importantly, aerates the flour, which is a crucial step towards achieving that light and fluffy crumb we adore in a Classic Vanilla Cake.
Step 3: The Art of Creaming – Butter & Sugar Magic
In a large mixing bowl using an electric hand mixer or a stand mixer fitted with the paddle attachment, beat the softened unsalted butter on medium speed for about 1-2 minutes until it’s smooth and creamy. Gradually add the granulated sugar, beating for a further 3-5 minutes. The Transformation: You’re looking for the mixture to become significantly lighter in colour (almost pale yellow/white) and beautifully fluffy in texture. Don’t rush this step! Proper creaming incorporates air, which is essential for a light cake. Scrape down the sides and bottom of the bowl frequently.
Step 4: Incorporate Eggs & Vanilla – Adding Richness & Aroma
With the mixer on low speed, add the room temperature eggs one at a time, beating well for about 30 seconds after each addition until fully incorporated and the batter is smooth. Scrape down the bowl. Now, beat in the glorious tablespoon of pure vanilla extract (and the optional vegetable oil if using). Why One at a Time? Adding eggs gradually helps them emulsify properly with the butter-sugar mixture, preventing a curdled appearance and resulting in a finer crumb.
Step 5: Alternating Wet & Dry – The Key to a Tender Crumb
This is where careful technique truly shines. With the mixer on its lowest speed, begin adding the dry ingredient mixture in three additions, alternating with the room temperature milk in two additions. Start and end with the dry ingredients. (Example: Add 1/3 dry, mix. Add 1/2 milk, mix. Add 1/3 dry, mix. Add 1/2 milk, mix. Add final 1/3 dry, mix.) Crucial Mixing Tip: Mix only until each addition is just combined. Overmixing at this stage develops gluten, resulting in a tougher cake. Stop as soon as most of the flour streaks disappear. A few tiny lumps are okay.
Step 6: Divide Batter & Bake to Golden Perfection
Gently pour the luscious batter evenly between your prepared cake pans. Smooth the tops lightly with an offset spatula or the back of a spoon. Baker’s Precision: For perfectly even layers, use a kitchen scale to weigh the batter in each pan. Bake in the preheated oven for 30-35 minutes. The Doneness Test: The cakes are ready when a wooden skewer or toothpick inserted into the center comes out clean, or with a few moist crumbs attached (but no wet batter). The tops should be golden brown and spring back lightly when gently pressed. Avoid opening the oven door for the first 20-25 minutes to prevent sinking.
Step 7: The All-Important Cool Down – Patience for Perfection
Once baked, let your Classic Vanilla Cake layers cool in their pans on a wire rack for about 15-20 minutes. This allows them to set slightly. Then, carefully run a thin knife or offset spatula around the edges of the pans and invert the cakes onto the wire rack to cool completely. This can take at least 1.5 to 2 hours. Why is Full Cooling Non-Negotiable? Attempting to frost even a slightly warm cake will result in melted, sliding frosting – a baker’s nightmare! Complete cooling ensures structural integrity and the perfect canvas for your frosting.
Step 8: (Optional) Whip Up the Silky Vanilla Buttercream
While the cakes cool, if you’re making frosting, now’s the time! In a large bowl using an electric mixer, beat the softened butter on medium speed until light and fluffy (about 2-3 minutes). Gradually add the sifted powdered sugar, one cup at a time, beating well after each addition and starting on low speed to avoid a sugar cloud. Once all sugar is incorporated, add the vanilla extract and a pinch of salt. Add the heavy cream or milk, one tablespoon at a time, beating until the frosting reaches your desired spreading consistency – light, fluffy, and irresistible. Beat for an extra 2-3 minutes on medium-high for ultimate fluffiness.
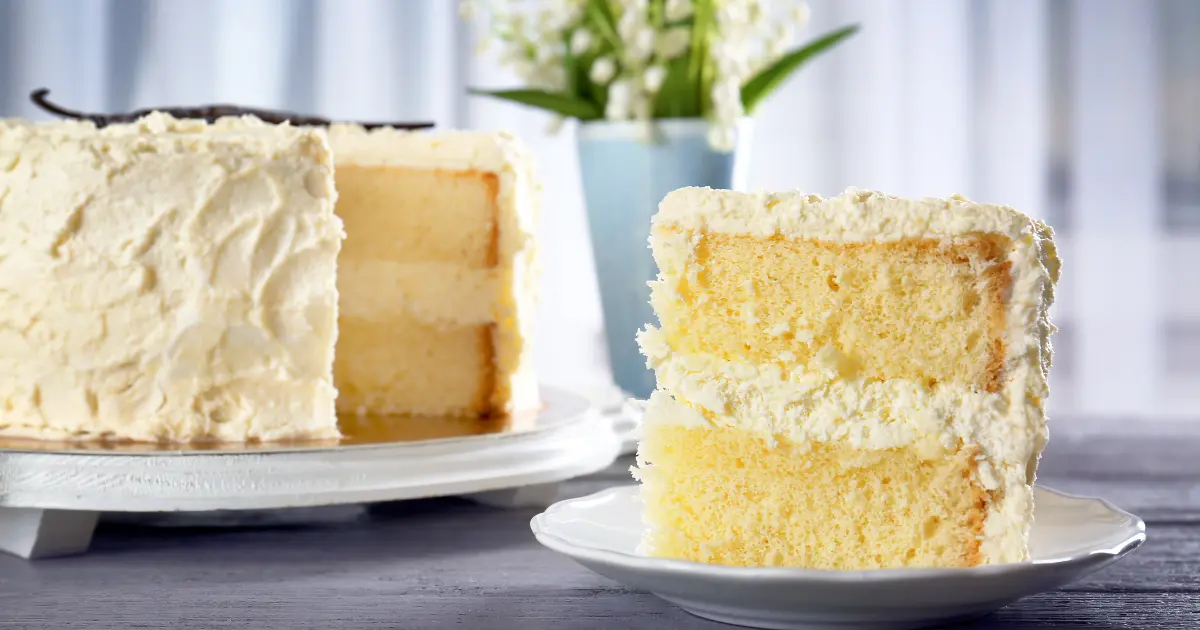
Step 9: Assemble Your Vanilla Cake Masterpiece
Once the cake layers are 100% cool, place one layer, top-side down (for a flatter surface), on your serving plate or cake stand. Spread a generous layer of vanilla buttercream evenly over the top. Place the second cake layer on top (again, top-side down is often flattest). Apply a thin “crumb coat” of frosting all over the cake (top and sides). Pro Tip: Chill the crumb-coated cake for 15-20 minutes in the refrigerator. This traps any loose crumbs, ensuring your final layer of frosting is pristine and beautiful. Generously apply the remaining frosting, smoothing with an offset spatula or creating decorative swirls.
Nutritional Information: A Slice of Classic Indulgence
Enjoying a slice of Classic Vanilla Cake is a delightful treat. Here’s an approximate nutritional breakdown per slice (assuming the cake is cut into 12 slices and lightly frosted):
- Calories: 380 – 500 kcal (will vary significantly based on frosting amount and type)
- Fat: 18 – 28g
- Saturated Fat: 10 – 16g (Primarily from butter)
- Carbohydrates: 50 – 70g
- Sugars: 35 – 50g (Significant contribution from sugar in cake and frosting)
- Protein: 4 – 6g
- Sodium: 200 – 300mg
Data Insight: This Classic Vanilla Cake, like most traditional cakes, is an energy-dense food, primarily due to its sugar and fat content. While providing immense joy and being a celebratory staple, it’s best enjoyed in moderation as part of a balanced diet. The use of whole milk and eggs does contribute some protein and micronutrients.
Healthier Alternatives for the Recipe: Lighter Twists on a Classic
Craving that Classic Vanilla Cake flavour but looking for slightly healthier adaptations? Here are some thoughtful modifications:
- Sugar Reduction: You can often reduce the granulated sugar in the cake batter by up to 1/4 to 1/3 cup (50-70g) without dramatically affecting the structure, though the cake will be less sweet. For the frosting, using less powdered sugar will result in a less sweet, more buttery frosting; you may need to adjust liquid accordingly.
- Smart Fat Swaps (Partial): Replace up to half of the butter in the cake with unsweetened applesauce, plain Greek yogurt (for added protein!), or mashed ripe banana. This can reduce fat and calories but will alter the crumb and flavour slightly – expect a denser, moister cake. Adding the optional oil already contributes to moistness, making this a good place to start with fat reduction.
- Whole Grain Boost: Substitute up to half of the all-purpose flour with white whole wheat flour or whole wheat pastry flour. This adds fibre and a nuttier flavour but will result in a denser cake.
- Egg White Power: For a slightly lighter cake, you could experiment with replacing one whole egg with two egg whites.
- Natural Sweeteners in Frosting: Explore frostings made with natural sweeteners like maple syrup or honey, though these typically have different textures (less fluffy) than traditional buttercream. A simple fruit glaze can also be a lovely, lighter topping.
- Portion Savvy: The simplest route! Cut smaller slices or make cupcakes for built-in portion control.
- Gluten-Free Classic Vanilla Cake: Use a high-quality 1:1 gluten-free all-purpose baking blend that contains xanthan gum in place of the all-purpose flour. Ensure all other ingredients (like baking powder and vanilla) are certified gluten-free. Baking times might vary slightly.
Serving Suggestions: Presenting Your Vanilla Vision
A beautiful Classic Vanilla Cake is a canvas for culinary creativity! Here are some delightful ways to serve it:
- Simply Elegant: A perfectly frosted slice on its own is timeless. The rich vanilla flavour needs no embellishment.
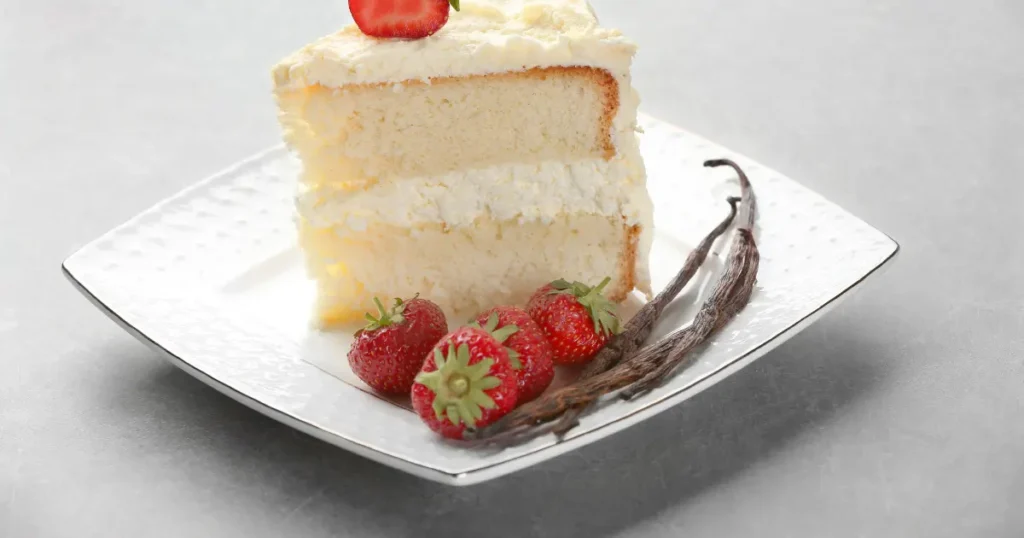
- Berry Bliss: Serve with a generous helping of fresh mixed berries (strawberries, raspberries, blueberries) or a vibrant berry coulis. The tartness beautifully complements the sweet vanilla. Consumer surveys consistently rate fruit pairings highly with vanilla cake.
- A La Mode Magic: A warm slice of cake (gently reheated) topped with a scoop of premium vanilla bean ice cream is pure heaven. Chocolate, strawberry, or caramel ice cream also work wonderfully.
- Saucy Sophistication: Drizzle with warm chocolate ganache, salted caramel sauce, or a fruit-based sauce like lemon curd or raspberry puree.
- Celebration Centerpiece: Decorate with sprinkles, edible flowers, chocolate shavings, or fresh fruit for birthdays, anniversaries, or any special occasion. This Classic Vanilla Cake is born to be a showstopper!
- Coffee or Tea Pairing: The perfect accompaniment to a cup of freshly brewed coffee, tea, or even a glass of cold milk.
Personalized Tip: For an extra touch of elegance, lightly dust the frosted cake with powdered sugar just before serving, or garnish individual slices with a single perfect berry and a mint sprig.
Common Mistakes to Avoid: Your Path to Vanilla Cake Perfection
Even a Classic Vanilla Cake can encounter pitfalls. Steer clear of these common baking blunders:
- The #1 Culprit: Overmixing the Batter (Especially After Adding Flour): This develops too much gluten, resulting in a tough, dense, or rubbery cake instead of a soft and fluffy one. Solution: Mix only until the ingredients are just combined, especially when alternating wet and dry. Stop as soon as major flour streaks disappear.
- Butter Too Cold or Too Melted for Creaming: Cold butter won’t cream properly to incorporate air, and melted butter will lead to a greasy, heavy cake. Solution: Ensure your butter is perfectly softened to room temperature (around 65-68°F or 18-20°C).
- Ingredients Not at Room Temperature (Eggs, Milk): Cold ingredients don’t emulsify well with the butter, leading to a curdled batter and a less tender crumb. Solution: Plan ahead and let your eggs and milk sit out for about 30-60 minutes before baking.
- Inaccurate Flour Measurement: Scooping flour directly from the bag compacts it, leading to too much flour and a dry, heavy cake. Solution: Use the “spoon and level” method: lightly spoon flour into your measuring cup, then level off the excess with a straight edge. For ultimate precision, weigh your flour.
- Overbaking the Cake: This is the surest way to a dry cake. Solution: Start checking for doneness a few minutes before the recipe’s minimum stated time. Rely on the toothpick test (clean or with moist crumbs) and the “spring back” test.
- Frosting a Warm Cake: Leads to melted, sliding frosting and a messy disaster. Solution: Be patient! Ensure the cake layers are 100% completely cool to the touch before attempting to frost. Baking industry data confirms this is a leading cause of home baking presentation issues.
Storing Tips for the Recipe: Keeping Your Classic Vanilla Cake Fresh
Proper storage ensures your delicious Classic Vanilla Cake stays moist and delightful:
- Unfrosted Cake Layers: Once completely cool, wrap each layer tightly in two layers of plastic wrap. They can be stored at room temperature for 1-2 days, or in the refrigerator for up to 4 days. They can also be frozen for up to 3 months (thaw overnight in the refrigerator, still wrapped, before frosting).
- Frosted Cake (Room Temperature): A cake frosted with buttercream (that doesn’t contain perishable fillings like cream cheese or fresh fruit) can usually be stored in an airtight cake container or under a cake dome at cool room temperature for up to 2-3 days.
- Frosted Cake (Refrigerator): If your room is warm, or if the frosting/filling is perishable, or for longer storage (up to 5 days), store the cake covered in the refrigerator. Important: Refrigeration can dry out cake. Always bring slices to room temperature (let sit out for 30-60 minutes) before serving for the best flavour and texture.
- Freezing Frosted Cake/Slices:
- Flash Freeze: Place the cake (or individual slices) uncovered in the freezer until the frosting is firm (about 1-2 hours).
- Wrap Tightly: Once firm, wrap the cake/slices tightly in several layers of plastic wrap, followed by a layer of aluminum foil or place in a freezer-safe container. Freeze for up to 2-3 months.
- Thaw: Thaw overnight in the refrigerator (still wrapped to prevent condensation from making it soggy). Bring to room temperature before serving.
Conclusion: You’ve Mastered the Art of the Classic Vanilla Cake!
Bravo, baker! You now hold the keys to creating an absolutely flawless Classic Vanilla Cake – one that is consistently soft, wonderfully fluffy, perfectly moist, and endlessly versatile. We’ve journeyed through selecting quality ingredients, mastering crucial techniques like proper creaming and gentle mixing, and understanding the importance of patience during the cooling process. This recipe proves that achieving bakery-quality results at home isn’t about elusive secrets, but about respecting the fundamentals and using a reliable guide.
This Classic Vanilla Cake is more than just a dessert; it’s a canvas for your creativity, a centerpiece for celebrations, and a comforting treat for any day of the week. You have the power to bake joy into every slice!
Ready to fill your home with the sweet aroma of pure vanilla perfection? We wholeheartedly invite you to try this definitive Classic Vanilla Cake recipe! Let us know how your baking adventure unfolds in the comments below. Share your triumphs, photos, and any delightful variations you create. We love hearing from our baking community! Craving more cake inspiration? Explore our recipes for [Link to Classic Chocolate Cake] or discover our guide to [Link to Perfect Lemon Pound Cake]. Happy Baking!
FAQs: Your Classic Vanilla Cake Questions Answered
- Q1: Can I use cake flour instead of all-purpose flour for this Classic Vanilla Cake? A1: Yes, absolutely! Cake flour has a lower protein content, which typically results in an even softer, more tender, and finer crumb. If using cake flour, a common substitution is to use 1 cup plus 2 tablespoons of cake flour for every 1 cup of all-purpose flour. For this recipe using 2 ½ cups AP flour, you’d use about 2 ¾ cups of cake flour.
- Q2: My vanilla cake turned out dense and heavy. What did I do wrong? A2: Several factors can lead to a dense cake: overmixing the batter (especially after adding flour), not creaming the butter and sugar sufficiently (which incorporates air), using cold ingredients (butter, eggs, milk), or measuring flour incorrectly (using too much). Review the steps for creaming and mixing carefully.
- Q3: How do I prevent my cake layers from doming in the middle? A3: Doming can be caused by an oven that’s too hot, too much leavening, or uneven heat distribution. Ensure your oven temperature is accurate (use an oven thermometer). You can also try using “bake even strips” (strips of fabric soaked in water and wrapped around the outside of the cake pans) to help the edges bake more slowly, promoting a flatter top. If they do dome, you can easily level them with a serrated knife once cooled.
- Q4: Can I bake this Classic Vanilla Cake recipe in a different pan size, like a 13×9 inch pan or Bundt pan? A4: Yes, with adjustments!
- 13×9 Inch Pan: The batter should fit well. Baking time will likely be similar or slightly longer, around 35-45 minutes. Start checking for doneness around 30 minutes.
- Bundt Pan (10-12 cup): This recipe should work. Ensure the Bundt pan is very well greased and floured. Baking time will be significantly longer, likely 45-60 minutes. Start checking at 45 minutes.
- Cupcakes: This recipe will make approximately 24 cupcakes. Fill liners 2/3 full and bake for 18-22 minutes.
- Q5: What’s the best way to ensure my vanilla flavour really shines through? A5: Use high-quality pure vanilla extract – the flavour is much richer and more complex than imitation. Don’t be shy with the amount (this recipe calls for a full tablespoon). For an even bigger vanilla punch, consider using vanilla bean paste or the seeds scraped from a whole vanilla bean in addition to or instead of extract.
- Q6: Can I make this Classic Vanilla Cake ahead of time? A6: Yes! The unfrosted cake layers can be baked, cooled completely, wrapped tightly, and stored at room temperature for 1-2 days or frozen for up to 3 months. The buttercream frosting can also be made ahead and stored in an airtight container in the refrigerator for up to a week (let come to room temperature and re-whip before using). Assemble and frost the cake closer to when you plan to serve it for the freshest taste.